Content Editor – Manipulating Objects – Overview
Basic Controls
Move
Shortcut: W
Move the object(s) around the stage
Rotate
Shortcut: E
Rotate the selected object(s)
Resize
Shortcut: R
Adjust the size/scale of the selected object(s)
Reset Rotation and Size
Shortcut: None
Reset any rotation and/or resizing applied to the selected object(s)
Snap to Ground
Shortcut: Left Shift + G
Bring the selected object(s) to the table level
Bounding Box Snap
Shortcut: Hold V
When moving an object it will snap to the bounds of other objects
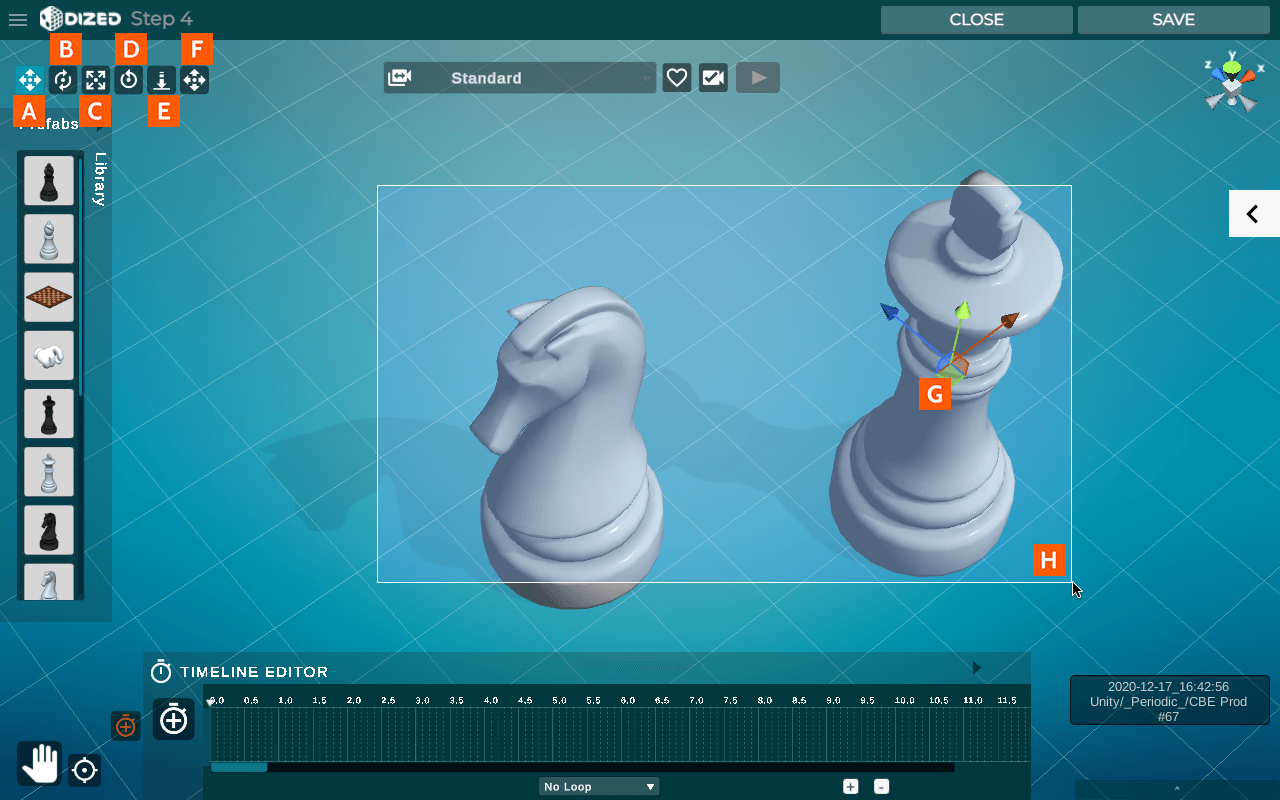
- Move (W)
- Rotate (E)
- Resize (R)
- Reset Rotation and Size
- Bring to “table level”. (Snaps to Object’s bounding box’ lowest corner)
- Bounding Box Snap (Hold V)
- Select Object: Hover Object + Left Mouse Button
- When selected, an Object has a Bounding Box (indicated by green highlighted corners) and an Anchor Point (point where the arrows meet). Object rotates around its Anchor Point.
- When selected, an Object has a Bounding Box (indicated by green highlighted corners) and an Anchor Point (point where the arrows meet). Object rotates around its Anchor Point.
- Select Multiple Objects:
- Draw a box around them, or
- Select individually by holding down the Shift key while selecting with Left Mouse Button.
- Draw a box around them, or
- Deselect Object(s): Left Mouse Button in an empty space on the stage
Aligning and Snapping
Content editor has a pre-existing grid with 2cm steps. The grid goes to all three dimensions but is visible on only 2 dimensions at the “table level”, the level where the Object shadows are also visible.
Snap to grid (Left Shift + S)
- Snap Selected Object’s Anchor Point to closest grid point in the pre-existing grid.
Snap to grid (Hold Left Shift)
- While Moving: Moves Object in with 2cm steps. To move Object in the pre-existing grid first snap to grid (Shift+S), and then move by holding down Left Shift.
- While Resizing: Snap to increments when Resizing.
- While Rotating: No effect. Rotation is done by 15° increments anyway.
Snap to Bounding Box (Hold V)
- Select an Object.
- Hold down V and hover over one corner of the object’s bounding box (indicated by green corners). Corners should be indicated by a grey box.
- Click and hold left mouse button on the selected corner and move Object next to another Object. Selected Object will now try to snap to the bounding box of the nearby Object(s).
Adding and Deleting
Adding an Object into a Content Step creates a clone of the original Object shown in the Library. This means that modifying an individual Object in the Content Step Editor does not affect the other Objects that are created from the same original.
There is no limit of how many Objects you can have in one Content Step.
- Add Objects by dragging them from the library to the content area.
- Delete an Object or Objects by first selecting and then clicking delete on the keyboard.
Pay attention when deleting as there is no undo yet! If you delete something important but have a saved version, exit the Content Editor without saving and come back.

