Audio – Voiceover
Voiceover is implemented into the content with the built-in text-to-speech generator or as individual audio files. Each Content Step can be assigned one voiceover, which will be played once as soon as the Content Step is accessed. It’s recommended to use text-to-speech voiceovers during the creation phase, and only record acted voiceovers once the content has been tested enough.
Text-to-speech voiceovers
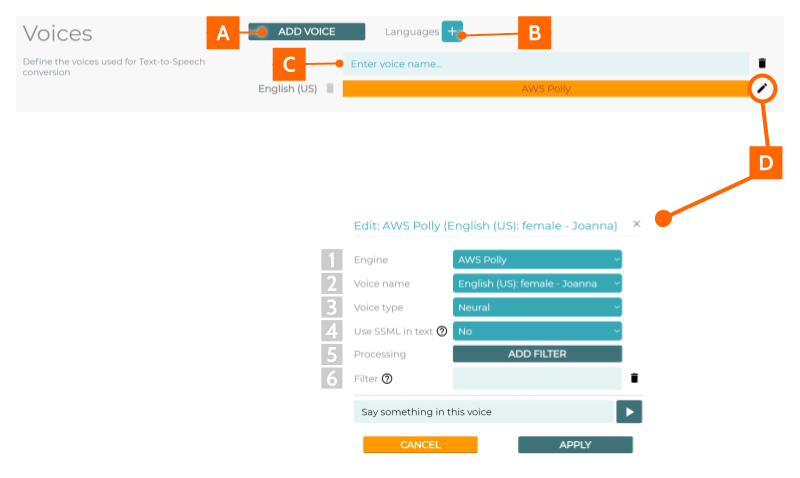
To implement text-to-speech voiceovers into the tutorial, the voices to be used have to be defined in settings.
- Add a new voice
- Add a new language (English is set as default)
- Give the voice a name
- Edit voice settings
- Engine
- Voice name
- Voice type
- Use SSML in text
- Processing
- Filter
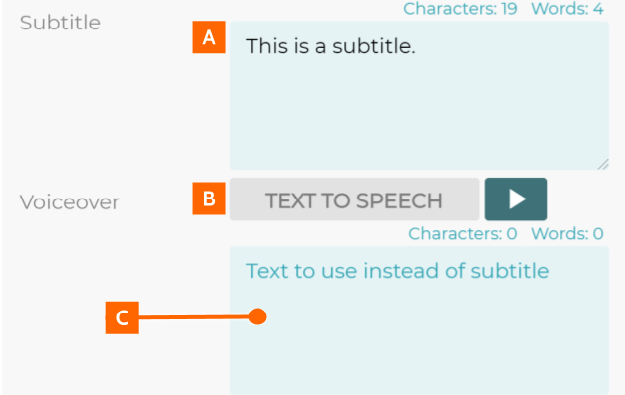
After the voices are added in the settings, the voiceovers can by applied to Content Blocks.
- Subtitles are added normally
- Apply text-to-speech voiceover
- Text to use instead of subtitle
Recorded voiceovers
It’s recommended to name the files to match the step names. For Example a step could be named “Setup05 Shuffle the red cards” and the accompanying voiceover file could be named ‘Setup05.mp3‘.
General guideline for voiceover files:
Filetype: MP3
Bitrate: ~128kbps
Sampling Frequency: 44100KHz
Channels: Mono
Padding: 150-200ms of Silence at the beginning and end of each segment
PEAK: max -3 dBFS
RMS: between -18 and -16 dBFS
Guidelines
- Use the best possible equipment available (microphone, preamp, acoustically treated room, microphone reflection filters, etc.)
- Recording space needs to be quiet from outside noise.
- Use a studio environment or acoustically treated room to minimize room echo. (Any soft material on walls and floors is better than nothing).
- Set recording level so that the audio doesn’t clip and monitor that constantly during recording (meaning that the audio level never exceeds 0dBFS).
- Match the selected style throughout the recording.
- Make the voice actor comfortable, remember to have regular pauses and to drink water occasionally (dry mouth emphasizes nasty mouth click sounds).
- It is recommended to record several takes of a line (especially in the beginning of the recording) and select the best take for the Deliverable.
- If in doubt which delivery style would work best for a certain line, feel free to put two versions into the file, but please remember the notify the Client (comment in the content document)
Common Recording Issues
-
Good quality
- Reference this also for the preferred loudness and the spacing between individual lines in the Deliverable.
- Example
-
Too much noise in the background
- Note that irregular sounds like clicks and especially speech/shouts etc. are worse than constant hum such as air conditioning noise.
- Check that the voice over talent doesn’t make additional sounds him/herself.
- Example
-
Room echo in an empty room
- Try a more sound-dampened room.
- Example
-
Room echo in a typical room
- Much better, but seek to improve even more by lowering input volume and speaking closer to the mic, and/or setting up acoustic panels or any soft material available on reflecting hard flat surfaces around the recording situation.
- Example
-
Input level too loud
- Lower the volume of the microphone input.
- Note that lowering the volume of audio after the recording doesn’t remedy the distorted clipping sound (going over 0 dbFS), so be sure to monitor the level during recording.
- Example


